SSH Remote IoT Device Tutorial: A Comprehensive Guide For Secure Connections
Connecting to remote IoT devices using SSH is a crucial skill for developers and IT professionals in today's interconnected world. IoT devices are becoming increasingly prevalent, and securing their communication channels is essential to protect sensitive data and maintain system integrity.
With the rapid expansion of the Internet of Things (IoT), managing and securing remote devices has become a top priority for organizations. SSH (Secure Shell) provides a secure protocol for remote access, ensuring encrypted communication between devices. This tutorial will guide you through the process of setting up and using SSH for remote IoT devices.
Whether you're a beginner or an experienced professional, this step-by-step guide will equip you with the knowledge and tools necessary to establish secure connections to your IoT devices. Let's dive in and explore the world of SSH remote IoT device management.
Read also:Mastering Remote Iot Vpc Ssh On Raspberry Pi Free Windows Download Guide
Table of Contents
- Introduction to SSH
- Why Use SSH for IoT Devices?
- Prerequisites for SSH Remote IoT Device Connection
- Setting Up an SSH Server on Your IoT Device
- Connecting to Your Remote IoT Device via SSH
- Security Best Practices for SSH
- Troubleshooting SSH Connections
- Advanced SSH Features for IoT Devices
- Automation with SSH for IoT Devices
- Conclusion
Introduction to SSH
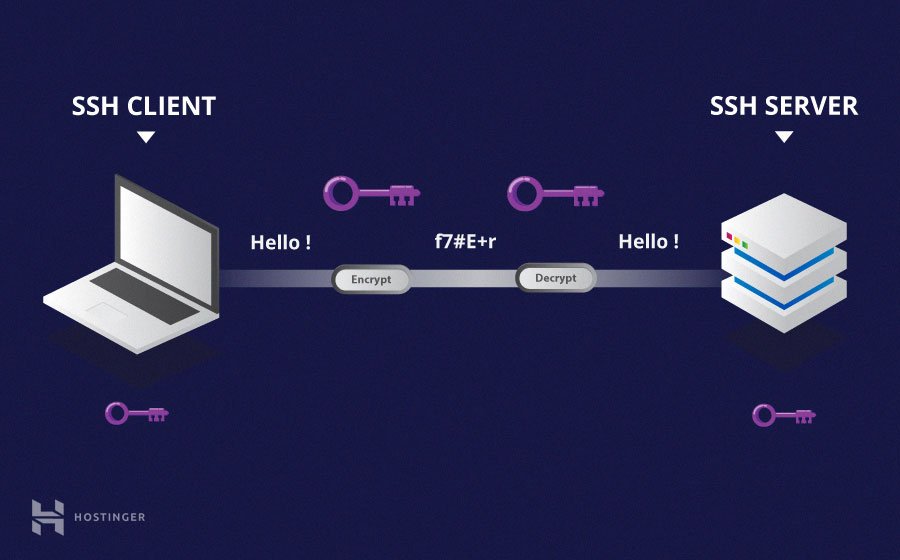
SSH, or Secure Shell, is a network protocol that facilitates secure communication between devices over an unsecured network. It is widely used for remote access to servers, routers, and IoT devices. By encrypting data transmission, SSH ensures confidentiality, integrity, and authentication in communication.
SSH operates on port 22 by default and provides a secure alternative to less secure protocols such as Telnet and FTP. It is supported by most operating systems, including Linux, macOS, and Windows, making it versatile for various applications.
In the context of IoT devices, SSH plays a critical role in managing and maintaining remote systems securely. Whether you're configuring sensors, monitoring environmental conditions, or updating firmware, SSH ensures that your interactions with IoT devices are protected from unauthorized access and data breaches.
Why Use SSH for IoT Devices?
Using SSH for IoT devices offers several advantages over other communication protocols. Below are some key reasons why SSH is the preferred choice for securing IoT connections:
- Encryption: SSH encrypts all data transmitted between devices, preventing eavesdropping and data tampering.
- Authentication: SSH supports multiple authentication methods, including password-based and public-key authentication, ensuring only authorized users can access the device.
- Compatibility: SSH is compatible with a wide range of IoT platforms and operating systems, making it easy to integrate into existing systems.
- Reliability: SSH connections are reliable and robust, even in environments with unstable network conditions.
These features make SSH an ideal solution for securing IoT devices, especially when they are deployed in remote or untrusted locations.
Prerequisites for SSH Remote IoT Device Connection
Hardware Requirements
Before setting up SSH for your IoT device, ensure you have the following hardware components:
Read also:Remoteiot Platform Download Your Ultimate Guide To Streamlining Iot Deployment
- An IoT device with an SSH-capable operating system (e.g., Raspberry Pi, ESP32 with Linux).
- A stable internet connection or local network access.
- A computer or laptop with an SSH client installed (e.g., PuTTY for Windows or Terminal for macOS/Linux).
Software Requirements
In addition to hardware, you'll need the following software:
- An SSH server installed on your IoT device (e.g., OpenSSH).
- An SSH client on your local machine.
- Basic knowledge of command-line operations.
Having these prerequisites in place will ensure a smooth setup process for SSH remote access to your IoT device.
Setting Up an SSH Server on Your IoT Device
Setting up an SSH server on your IoT device involves several steps. Below is a detailed guide:
Step 1: Enable SSH on Your IoT Device
Depending on your IoT device's operating system, enabling SSH may vary. For example, on a Raspberry Pi running Raspbian:
- Open the Raspberry Pi Configuration tool by typing `sudo raspi-config` in the terminal.
- Navigate to "Interfacing Options" and enable SSH.
- Reboot your device to apply the changes.
Step 2: Install OpenSSH Server
If your IoT device does not have an SSH server installed, you can install OpenSSH using the following command:
sudo apt update && sudo apt install openssh-server
This will install the necessary packages to enable SSH functionality on your device.
Step 3: Configure SSH Server
After installing the SSH server, you can customize its settings by editing the configuration file:
sudo nano /etc/ssh/sshd_config
Some common configurations include:
- Changing the default SSH port (e.g., from 22 to a custom port).
- Disabling password authentication and enabling public-key authentication for added security.
Connecting to Your Remote IoT Device via SSH
Once the SSH server is set up on your IoT device, you can connect to it remotely using an SSH client. Follow these steps:
Step 1: Obtain the Device's IP Address
Identify the IP address of your IoT device. You can do this by running the following command on the device:
hostname -I
This will display the IP address assigned to your device.
Step 2: Connect Using an SSH Client
On your local machine, open the SSH client and enter the following command:
ssh username@device_ip_address
Replace "username" with the appropriate user account on your IoT device and "device_ip_address" with the IP address obtained in the previous step.
Security Best Practices for SSH
While SSH provides a secure communication channel, it's essential to follow best practices to enhance security:
- Use Strong Passwords: Avoid using weak or easily guessable passwords for SSH accounts.
- Enable Public-Key Authentication: Disable password-based authentication and use public-key authentication for added security.
- Change Default Port: Change the default SSH port (22) to a custom port to reduce the risk of automated attacks.
- Limit User Access: Restrict SSH access to specific users or groups to minimize potential security risks.
Implementing these practices will help protect your IoT devices from unauthorized access and potential cyber threats.
Troubleshooting SSH Connections
Occasionally, you may encounter issues when connecting to your IoT device via SSH. Below are some common problems and their solutions:
- Connection Refused: Ensure the SSH server is running and the device's firewall allows SSH traffic.
- Incorrect Credentials: Verify the username and password or public key used for authentication.
- Network Issues: Check the device's network connection and ensure it has a valid IP address.
If the issue persists, consult the SSH server logs for more detailed information about the problem.
Advanced SSH Features for IoT Devices
SSH offers several advanced features that can enhance its functionality for IoT applications:
- Tunneling: Use SSH tunneling to securely access services running on your IoT device, such as web servers or databases.
- Port Forwarding: Forward specific ports from your local machine to the IoT device for remote access to services.
- SSHFS: Mount remote file systems on your local machine using SSHFS for seamless file management.
Exploring these features can unlock new possibilities for managing and interacting with your IoT devices.
Automation with SSH for IoT Devices
Automating tasks with SSH can significantly improve efficiency in managing IoT devices. Below are some examples:
- Scripting: Write scripts to automate routine tasks, such as updating firmware or collecting sensor data.
- Cron Jobs: Schedule SSH commands to run at specific intervals for regular maintenance tasks.
- Remote Monitoring: Use SSH to monitor device performance and health metrics remotely.
By leveraging automation, you can streamline operations and reduce manual intervention in managing your IoT infrastructure.
Conclusion
In conclusion, SSH is a powerful tool for securely managing remote IoT devices. By following the steps outlined in this tutorial, you can establish a secure connection to your IoT devices and take advantage of the many benefits SSH offers. Remember to adhere to security best practices and explore advanced features to enhance your IoT management capabilities.
We encourage you to share your experiences and insights in the comments section below. Additionally, feel free to explore other articles on our site for more in-depth guides and tutorials on IoT and related technologies. Together, let's build a secure and connected future!
