How To Access Raspberry Pi SSH Remotely: A Comprehensive Guide
Accessing your Raspberry Pi remotely via SSH can significantly enhance your productivity, especially if you're working on projects that require remote management. Whether you're a hobbyist, a professional developer, or an enthusiast, learning how to set up and use SSH for remote access is a crucial skill. This guide will walk you through the process step by step, ensuring you can securely connect to your Raspberry Pi from anywhere in the world.
SSH, or Secure Shell, is a protocol that allows you to remotely control and manage devices over a network. It provides a secure and encrypted connection, making it ideal for remote access. With SSH, you can execute commands, transfer files, and manage your Raspberry Pi without needing physical access to the device.
In this article, we will cover everything you need to know about accessing Raspberry Pi SSH remotely, including setting up SSH, configuring network settings, and troubleshooting common issues. By the end of this guide, you'll have the skills and knowledge to remotely manage your Raspberry Pi with confidence.
Read also:Unlocking The Potential Of Ssh Remote Iot Device Raspberry Pi Free
Table of Contents
- What is SSH?
- Raspberry Pi SSH Setup
- How to Access Raspberry Pi SSH Remotely
- Using Dynamic DNS for Remote Access
- SSH Tunneling for Secure Connections
- Security Best Practices for SSH
- Troubleshooting Common Issues
- Conclusion
What is SSH?
SSH, or Secure Shell, is a network protocol that provides a secure way to access and manage remote devices. It encrypts all data transmitted between the client and the server, ensuring that sensitive information remains protected. SSH is widely used in IT environments for tasks such as remote administration, file transfer, and automated processes.
One of the primary advantages of SSH is its ability to establish a secure connection over unsecured networks. This makes it ideal for accessing devices remotely, such as your Raspberry Pi, without compromising security. By using SSH, you can execute commands, manage files, and perform administrative tasks as if you were physically present at the device.
Raspberry Pi SSH Setup
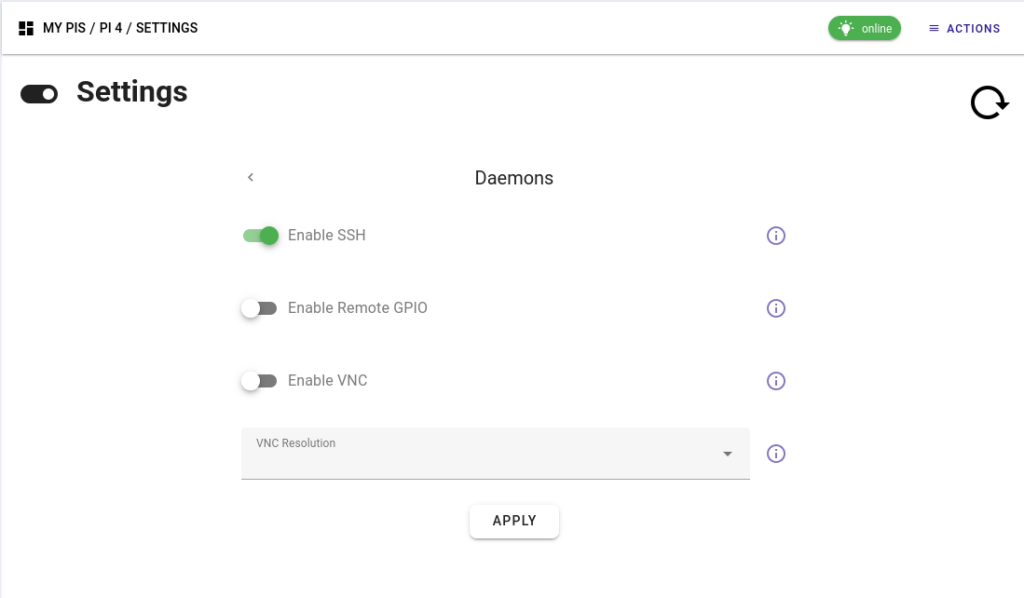
Enabling SSH on Raspberry Pi
Before you can access your Raspberry Pi remotely via SSH, you need to ensure that SSH is enabled on the device. Here's how you can do it:
- Power on your Raspberry Pi and connect it to your local network.
- Open the Raspberry Pi Configuration tool by typing
sudo raspi-configin the terminal. - Select Interfacing Options and navigate to SSH.
- Choose Enable to activate SSH on your Raspberry Pi.
- Reboot your Raspberry Pi to apply the changes.
Alternatively, you can enable SSH by creating an empty file named "ssh" on the boot partition of your Raspberry Pi's SD card. This method is particularly useful if you're setting up a headless Raspberry Pi without a monitor or keyboard.
Finding Your Raspberry Pi IP Address
To connect to your Raspberry Pi remotely, you need to know its IP address. Here's how you can find it:
- Open the terminal on your Raspberry Pi.
- Type
hostname -Ito display the IP address. - Alternatively, you can use network scanning tools like
nmapor check your router's connected devices list.
Once you have the IP address, you can use it to establish an SSH connection from another device on the same network.
Read also:Remoteiot Platform Ssh Download Your Ultimate Guide To Secure Remote Access
How to Access Raspberry Pi SSH Remotely
Using an SSH Client
Accessing your Raspberry Pi remotely requires an SSH client on your local machine. Here are some popular SSH clients:
- Terminal (macOS/Linux): Built-in SSH client available in the terminal.
- Putty (Windows): A free and widely-used SSH client for Windows users.
- Windows 10+: SSH is now built into Windows, allowing you to use the command line for SSH connections.
To connect to your Raspberry Pi, open your SSH client and enter the following command:
ssh pi@
Replace
Configuring Port Forwarding
If you want to access your Raspberry Pi from outside your local network, you need to configure port forwarding on your router. Here's how:
- Log in to your router's admin interface using its IP address.
- Locate the port forwarding settings and add a new rule.
- Set the external port to 22 (default SSH port) and the internal IP address to your Raspberry Pi's IP address.
- Save the settings and test the connection by using your public IP address in the SSH client.
Using Dynamic DNS for Remote Access
Your public IP address may change periodically, making it difficult to maintain a stable connection. To solve this, you can use a Dynamic DNS (DDNS) service. DDNS automatically updates your domain name to reflect changes in your public IP address.
Popular DDNS services include:
- No-IP
- Dynu
- FreeDNS
By setting up DDNS, you can use a consistent domain name to access your Raspberry Pi remotely, regardless of changes in your IP address.
SSH Tunneling for Secure Connections
SSH tunneling allows you to securely transfer data between your local machine and a remote server. This is particularly useful for accessing web interfaces or services running on your Raspberry Pi from outside your network.
To create an SSH tunnel, use the following command:
ssh -L
This command forwards traffic from your local machine's
Security Best Practices for SSH
While SSH provides a secure connection, it's essential to follow best practices to protect your Raspberry Pi from unauthorized access:
- Change the Default Password: Update the default "raspberry" password to a strong, unique password.
- Disable Root Login: Disable root login to prevent attackers from gaining administrative access.
- Use Key-Based Authentication: Replace password-based authentication with SSH keys for added security.
- Change the Default SSH Port: Change the default port (22) to a non-standard port to reduce automated attack attempts.
- Install a Firewall: Use tools like
ufwto restrict access to only necessary ports.
Troubleshooting Common Issues
Here are some common issues you may encounter when setting up remote SSH access and how to resolve them:
- Connection Refused: Ensure SSH is enabled on your Raspberry Pi and verify the IP address.
- Permission Denied: Check your SSH client's configuration and ensure the correct username and password are used.
- Timeout Errors: Confirm your router's port forwarding settings and firewall rules.
- Public Key Errors: Verify that your SSH keys are correctly configured on both the client and server.
Conclusion
Accessing your Raspberry Pi remotely via SSH opens up a world of possibilities for remote management and automation. By following the steps outlined in this guide, you can securely connect to your Raspberry Pi from anywhere, ensuring you have full control over your device.
We encourage you to experiment with SSH and explore its capabilities further. If you have any questions or need clarification on any of the topics discussed, feel free to leave a comment below. Additionally, don't forget to share this article with others who might find it helpful and explore more articles on our site for advanced Raspberry Pi projects!
References:
